How to: Cisco ISE backup to SFTP repository with public key authentication
Side note: It can happen that after an update/upgrade of the Cisco ISE the communication with the SFTP repository isn't possible anymore. It should be sufficient to generate a new SSH key via the GUI (#) and add it to the
authorized_keysof the SFTP server (#) again.
> Related error messages
click to unfold
Update 15.10.24 #
This article has been updated to a new version. The process is the same, but all screenshots have been replaced.
Previous: Cisco ISE, Version 3.1.0.518, ADE-OS Version 3.1.0.135, VM cluser.
New: Cisco ISE, Version 3.3.0.430, ADE-OS Version 3.3.0.181, VM cluser.
Requirements #
Let me start with a list of things that are required:
- Access to Cisco, via GUI and CLI as admin
- SFTP server + user, and root access
- Network access: ISE > SFTP server over TCP/22 (SSH - as SFTP transfers data over it)
My setup is explained in the next section.
Some prior Linux knowledge will help you, but I've tried to keep it as simple as possible with additional explanations.
Overview
I've replaced some internal data with dummy data. You can find the overview here.
Cisco ISE, Version 3.3.0.430, ADE-OS Version 3.3.0.181, VM cluser.
Ubuntu 22.04.3 LTS as SFTP server accessible via backup-server (10.10.10.10). The user account for the backups is called ise, and Mysecureshell was used to set it up. The backups will be saved in the home directory of said user under /home/ise/ise-bk-new.
More specific information will follow. Keep in mind that some configurations might change depending on your setup.
On the ISE, we are mainly working within these two menues.

SFTP Server - Create a backup directory on the SFTP server
We are going to save the backups in the home directory of the SFTP user ise. We are going to switch to said directory as root and, create a new directory for the backups, and change the necessary permissions.
- Switch to home directory of user
ise: root@backup-server:# cd /home/ise/- Create a new directory:
root@backup-server:# mkdir ise-bk-new- Change ownership from
rootto userise root@backup-server:# chown ise:ise ise-bk-new- Change permissions of directory:
root@backup-server:# chmod 755 ise-bk-new755translates to:- user: read (r) 4, write (w) 2, execute (x) 1
- group: read (r) 4, execute (x) 1
- others: read (r) 4, execute (x) 1
You can confirm the changes with ll:
root@backup-server:# ll
drwxr-xr-x 2 ise  ise  4096 Okt  1 01:11 ise-bk-new
ISE GUI - Create new repository
Open the GUI of the ISE as an admin and go to the following menu: System > Maintenance > Repository.
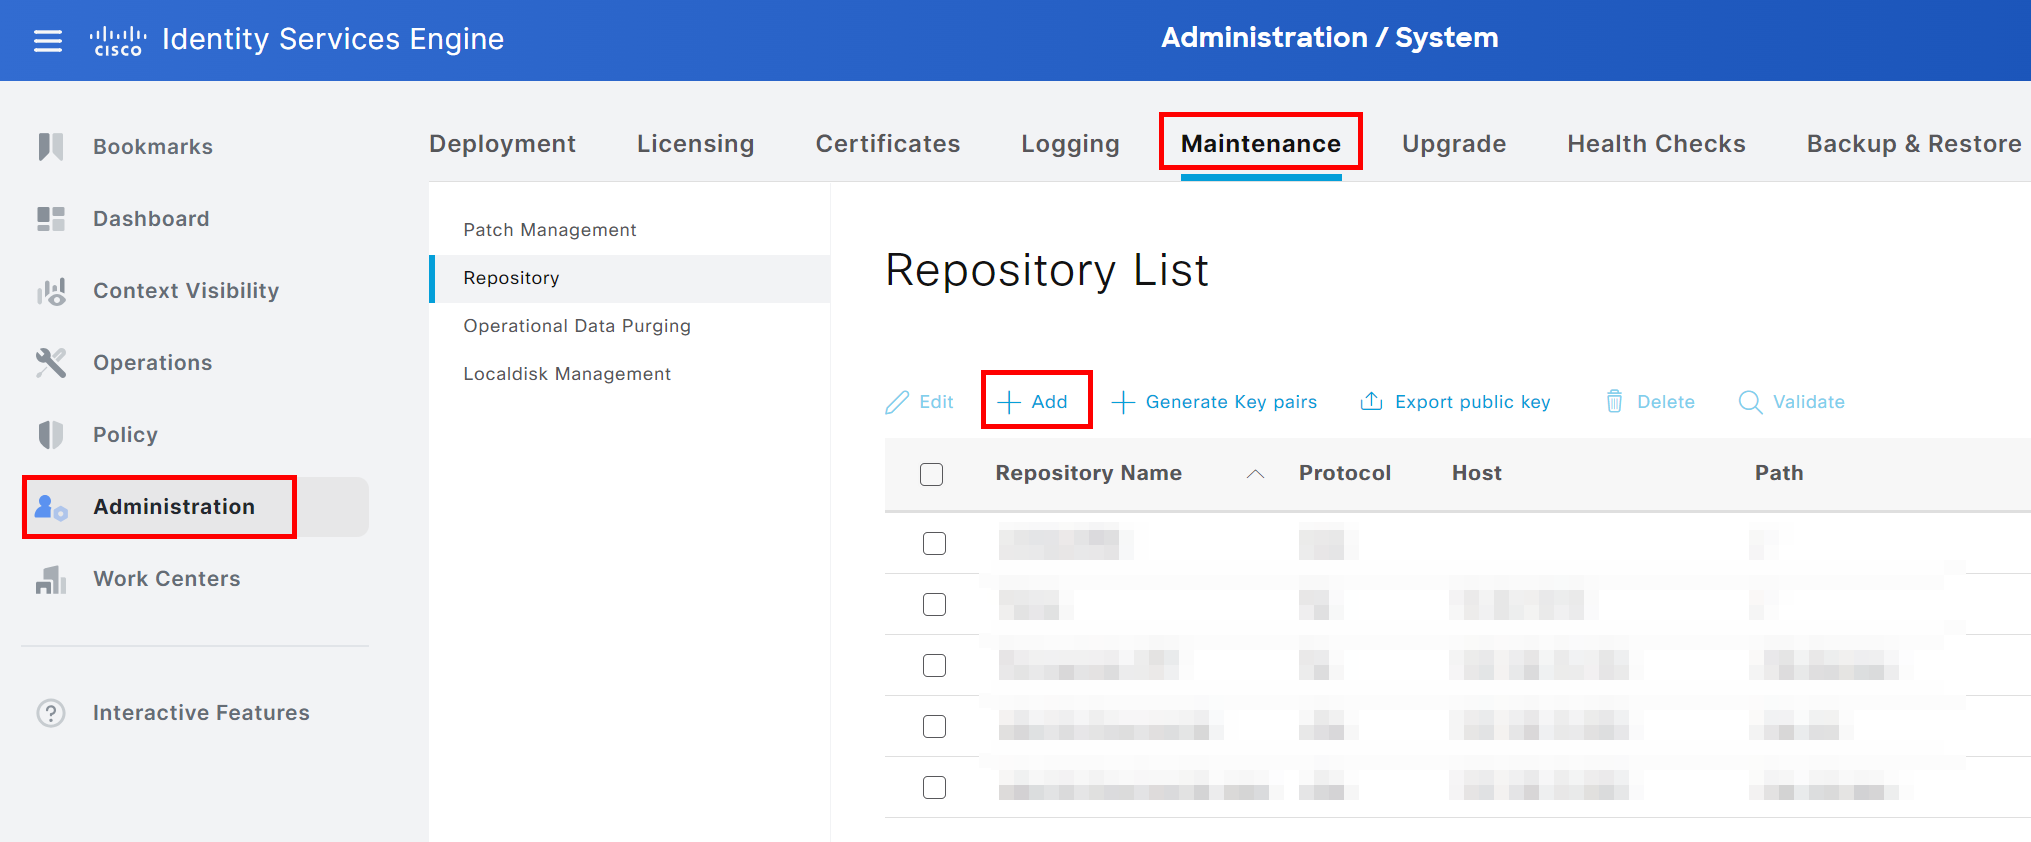
Click on +Add and choose SFTP as the protocol.
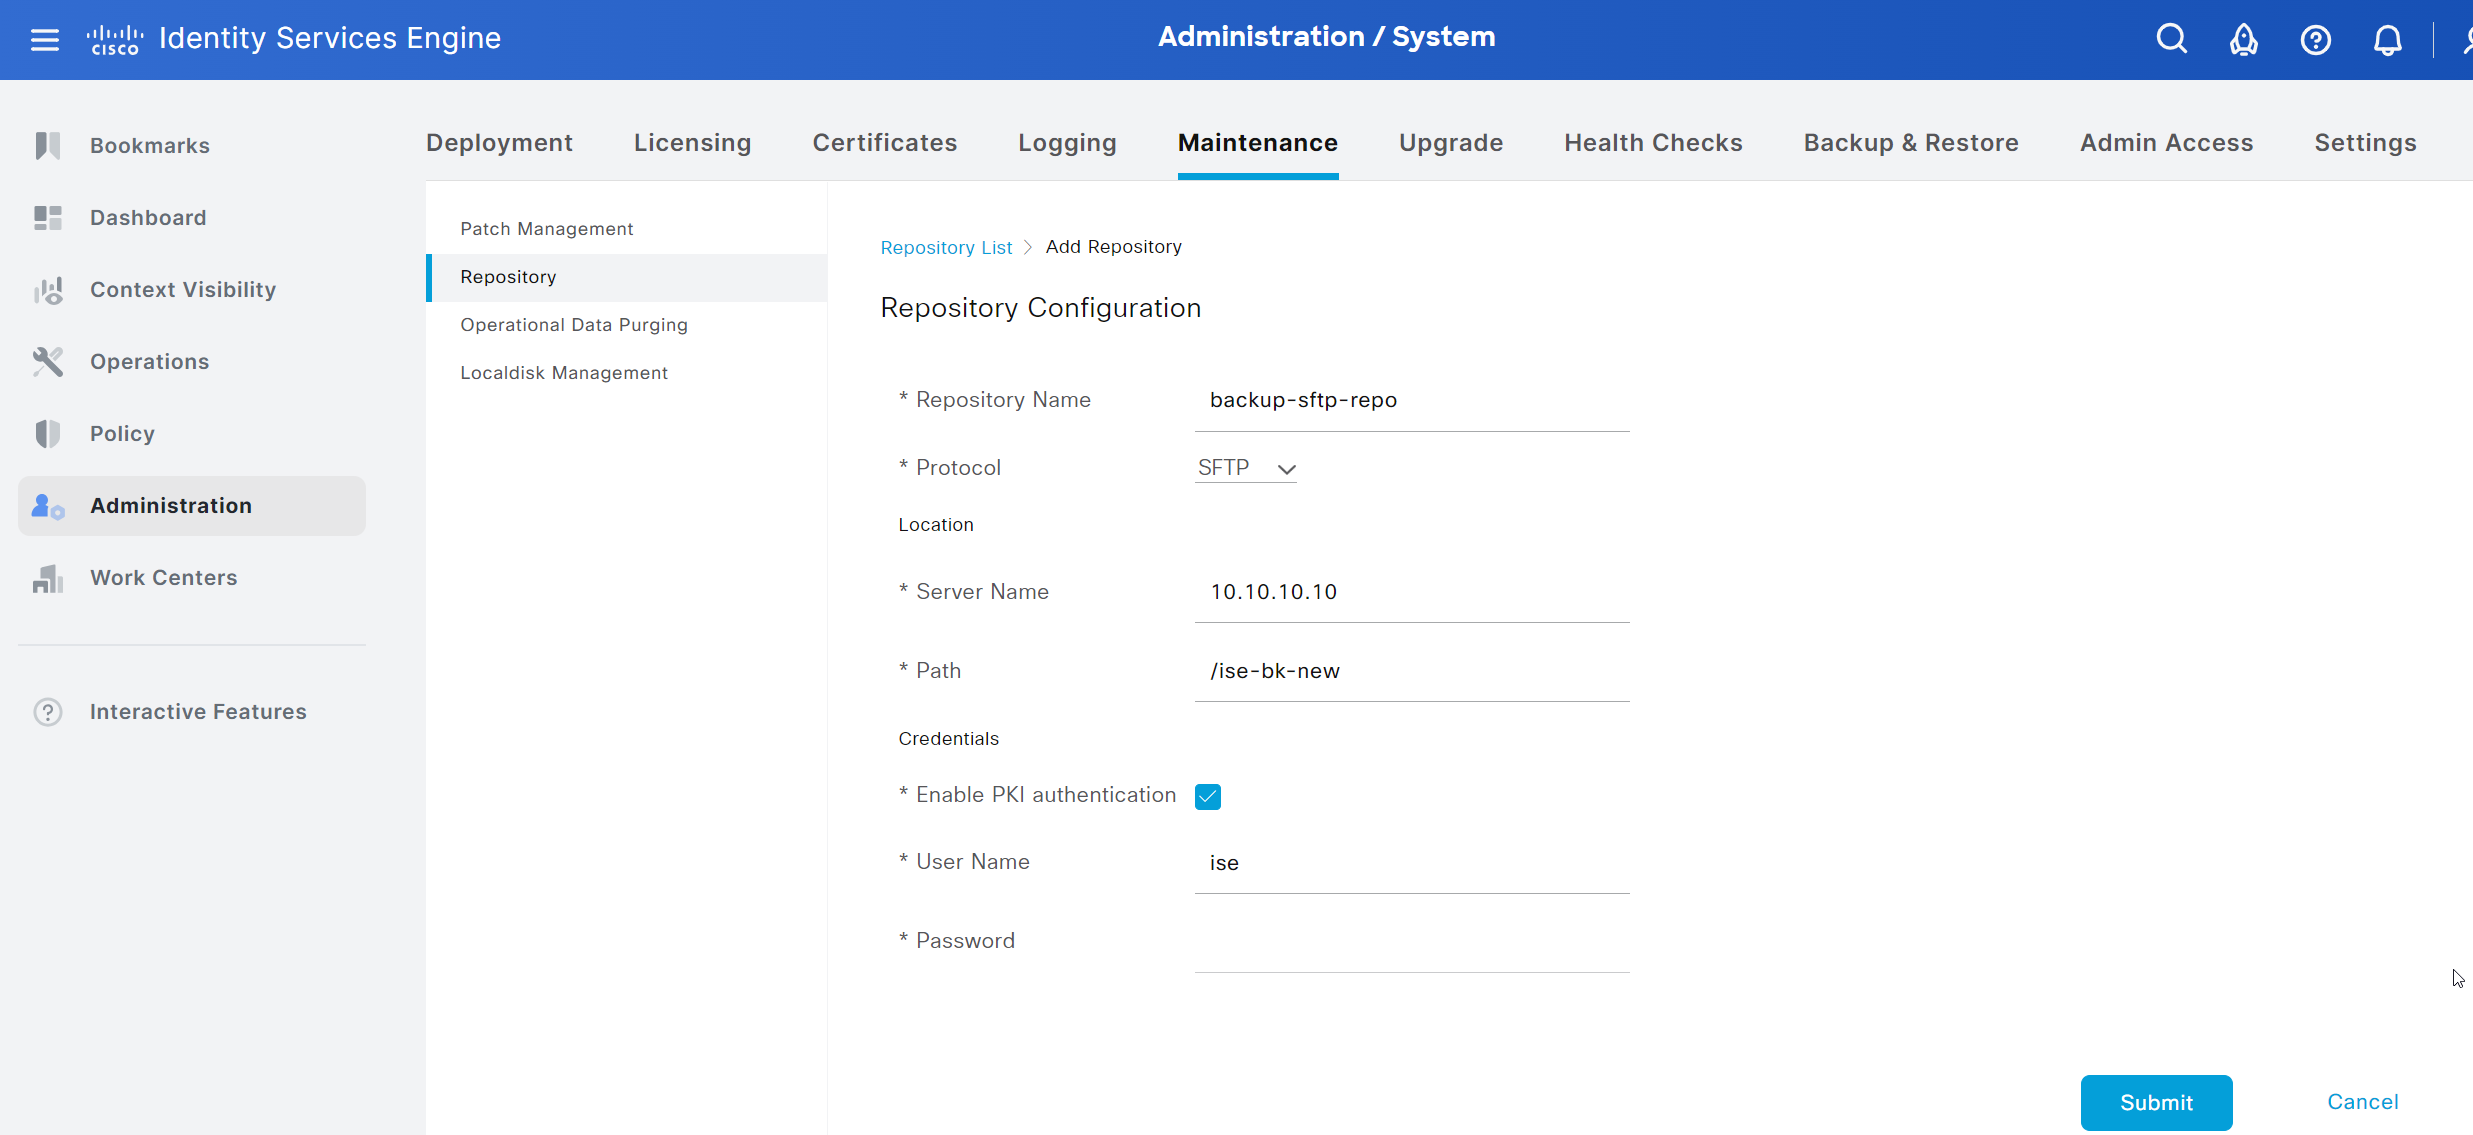
Choose a name for the repository, enter the IP or hostname of the SFTP server and the Path relative to the home directory of the SFTP user ise. As a side note: I haven't checked if the full absolute paths would work too.
Finally, enable PKI authentication by checking the box for Enable PKI authentication, enter the SFTP user and keep the password field empty as we will use a public key for authentication.
Click save to confirm the creation.
ISE GUI - Create a new key pair for GUI user
Right after, we create a key pair for this repository/ GUI user and export the public of that key pair.
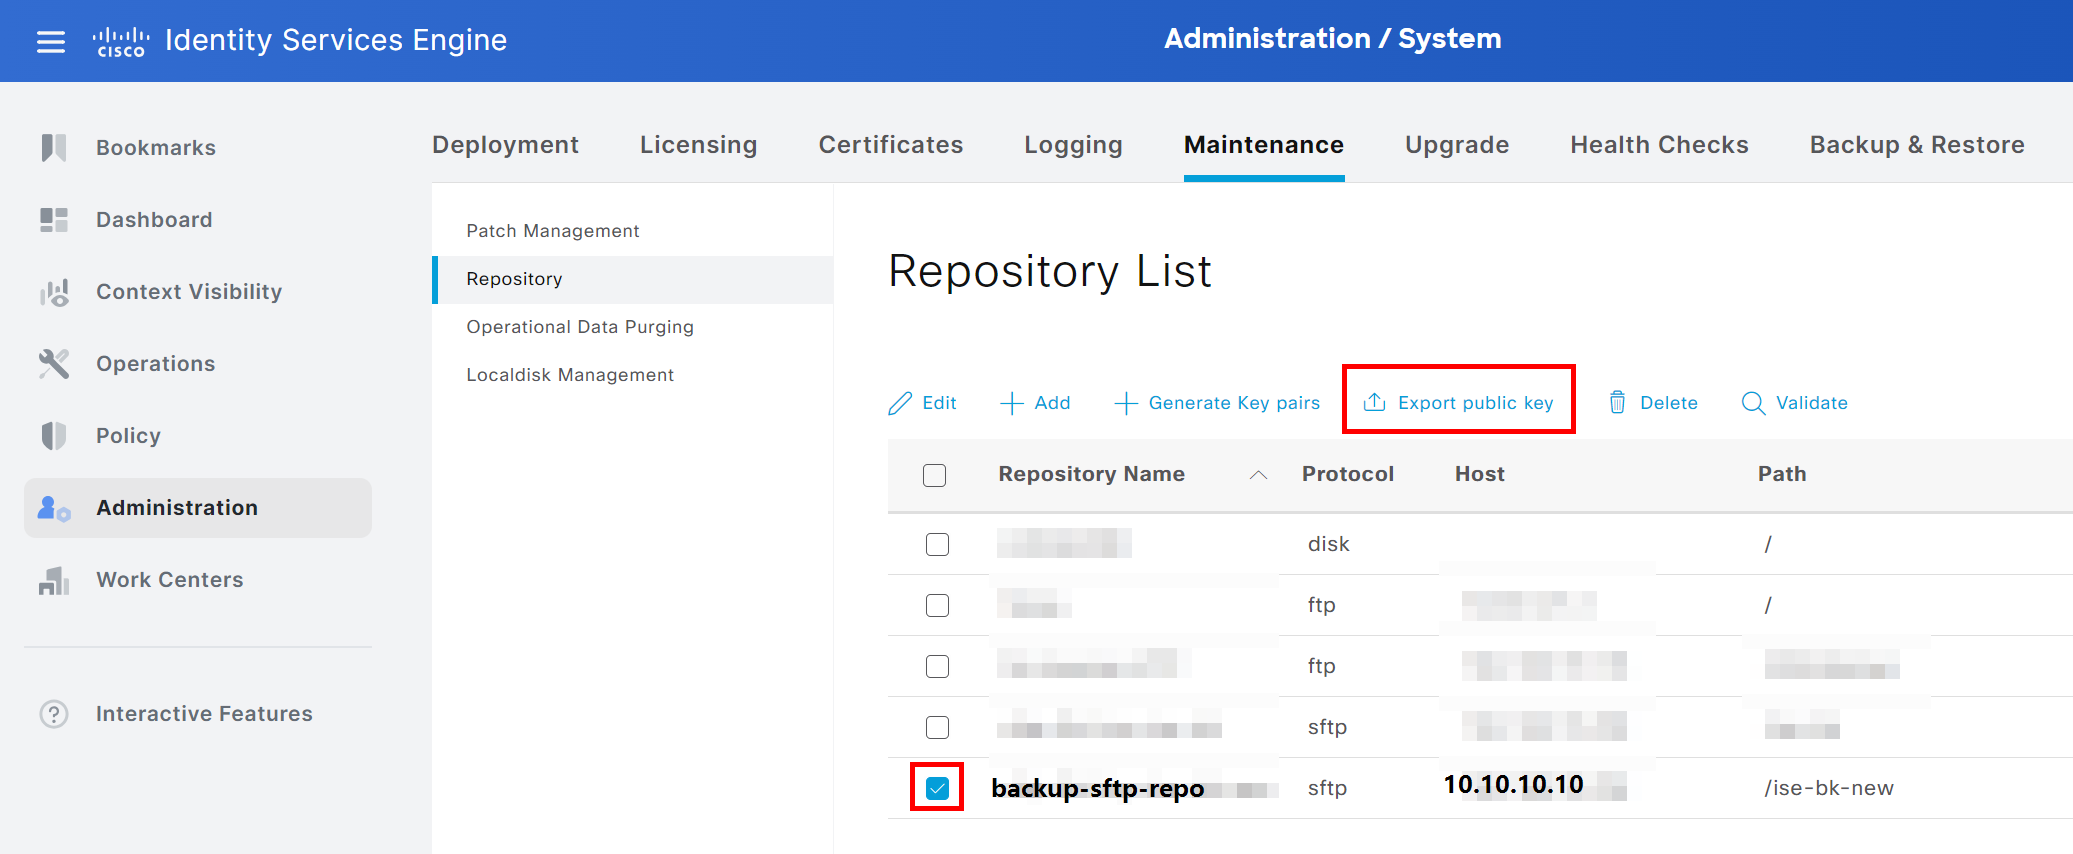
Choose the new repository, click on + Generate Key pairs, and choose a strong passphrase.
Don't forget to store that passphrase in a secure place!

Next, we will export the public key by choosing the repository again and clicking Export public key. Save it somewhere on your computer for now; we are going to need it later.
ISE CLI - Add SFTP server host key to ISE
Important: In a cluster, this section has to be done on every ISE node so it keeps working after a fail-over! Source
Next, open the CLI of the ISE as root.
- Add the host key of the SFTP server to the ISE with the following command:
crypto host_key add host ipAddressOrHostnameOfTheSFTPServer- Important: the IP or hostname must match the
Server Namethat has been specific in the repository in a previous section! - You can check if the host key was added with:
show crypto host
ISE CLI - Create a second key pair in CLI
We now have to create another key pair.
- Create key pair for in CLI:
crypto key generate rsa passphrase ReallyStrongAndSecurePassphrase- Again, save this passphrase in a secure place as well
We now have to export this public key to a local repository and can download it via ISE GUI.
- Export key to the local disk:
crypto key export ChooseNameForPublicKey repository LOCALDISKChooseNameForPublicKey- just in case, replace with a random nameLOCALDISK- name of the local repository on ISE
Now you need to download the second public key in the GUI under System > Maintenance > Localdisk Management.
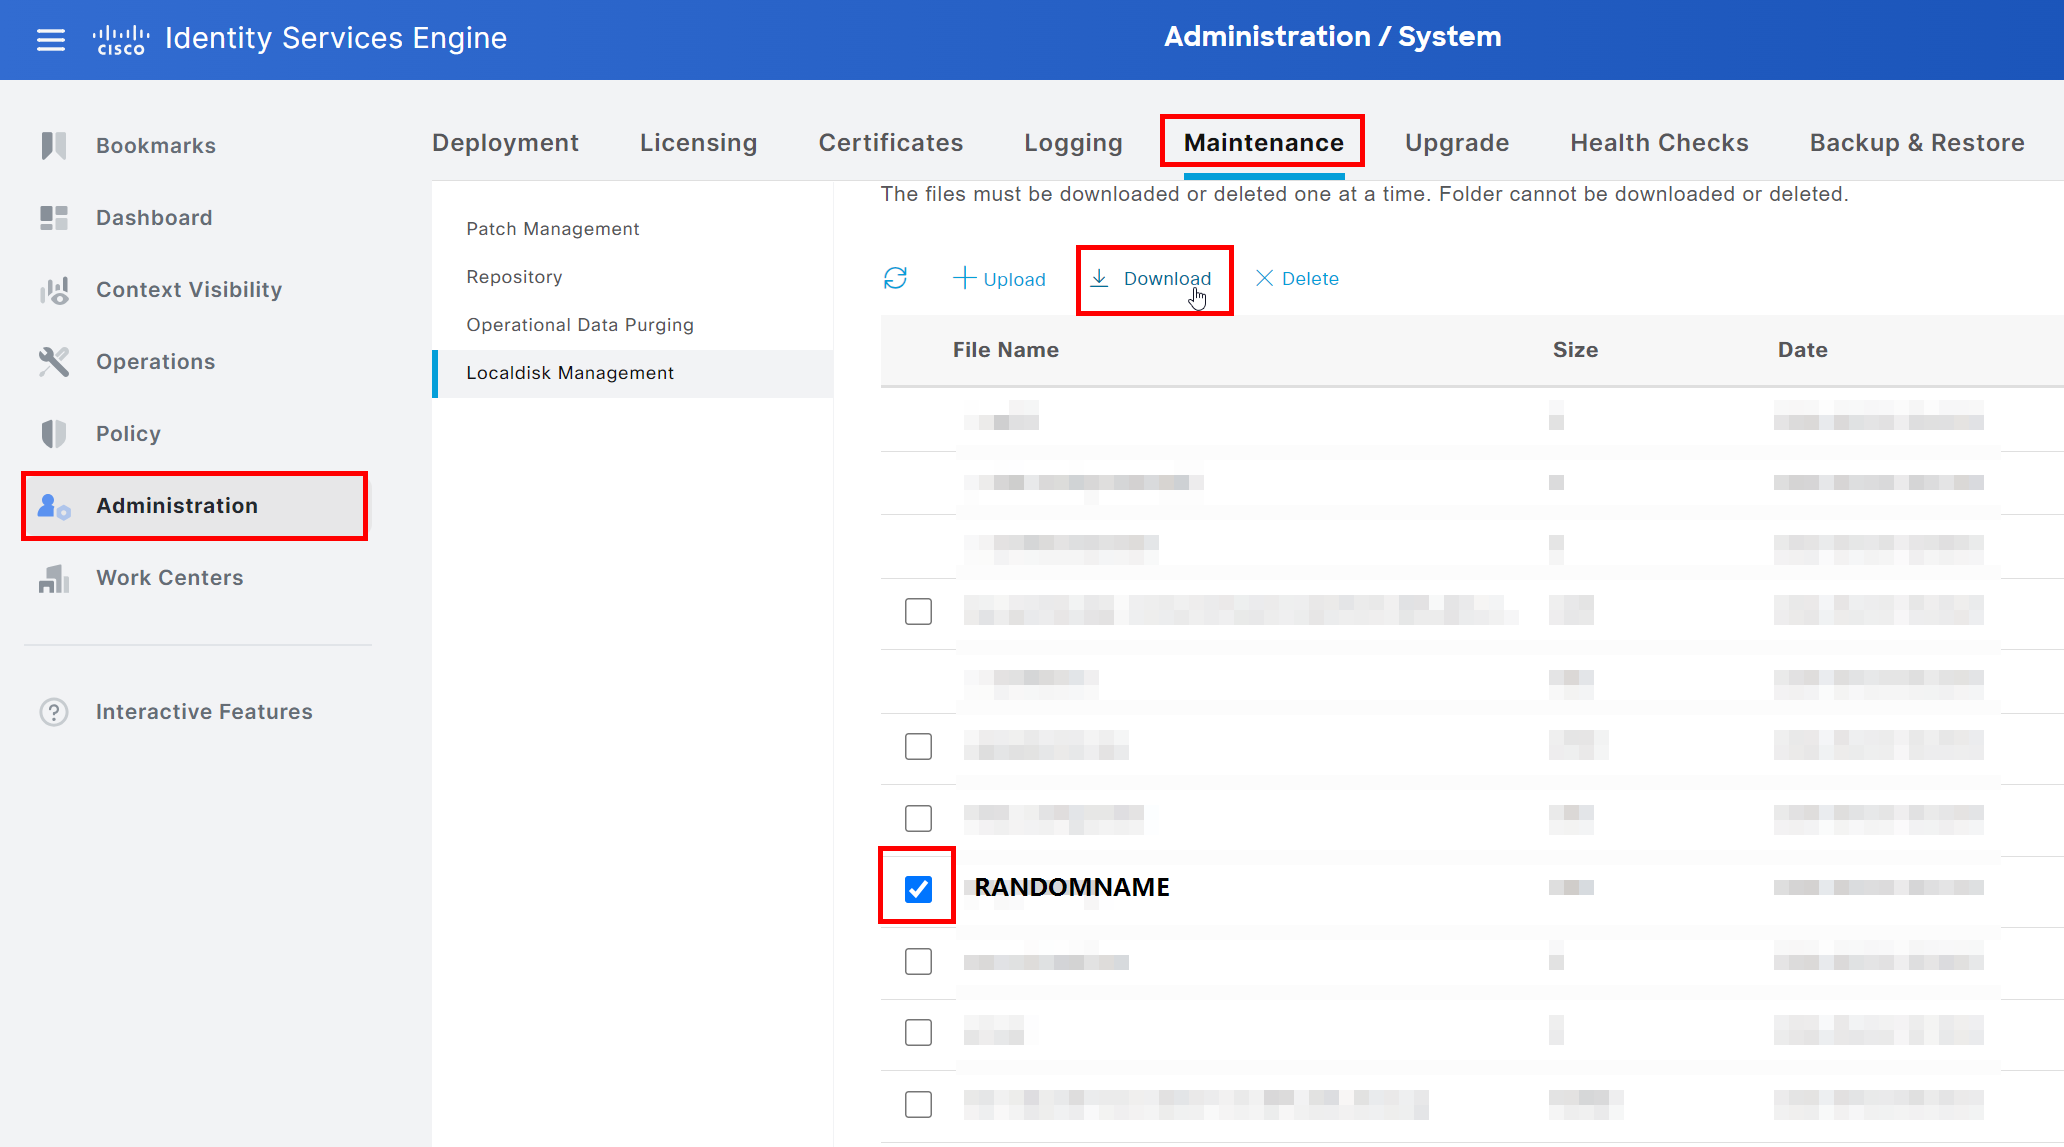
Save it to your computer.
SFTP Server - change SSH server configuration
So, from my experience, most SSH servers have authentication via public key disabled by default. We have to check it and might have to change some configurations.
We want to modify the configuration file of the SSH server to enable public key authentication. The default file is /etc/ssh/sshd_config, and sudo permissions are required.
Side note: Depending on your environment, it is not recommended to change the default configuration file as some management solutions or servers could overwrite them regularly. You could create a new .conf file in the /etc/ssh/sshd_config.d/ directory to keep the ISE configuration separate. Just make sure that the reference to this directory is present in the default configuration file: Include /etc/ssh/sshd_config.d/*.conf.
Open the configuration file in your favorite text editor and change or add the file according to the following options.
- Enable public key authentication:
PubkeyAuthentication yes- Enable RSA authentication:
RSAAuthentication yes- Make sure that the
authorized_keysfile is included: AuthorizedKeysFile .ssh/authorized_keys .ssh/authorized_keys2 ~/.ssh/authorized_keys
Important: Don't forget to remove the leading # as it marks the whole line as a comment and will be ignored by the server!
Restart the SSH server with sudo systemctl restart sshd - which should be the default way to run your SSH server.
Side note: Depending on your version of the SSH server, you have to accept RSA keys with:
HostkeyAlgorithms +ssh-rsa
PubkeyAcceptedAlgorithms=+ssh-rsa
HostKey /etc/ssh/ssh_host_rsa_key
As a reference and troubleshooting tips: SSH - How to use public key authentication on Linux
SFTP Server - add public keys to authorized_keys file
So, we've created our key pairs on the ISE. We now have to make sure that the SFTP server trusts these.
To make this happen, we have to add the previously downloaded public keys to the authorized_keys file of the user ise. You can find the file in the .ssh directory in the home directory of the user.
/home/ise/.ssh/authorized_keys
Important: If it does not exist, you have to create it and make sure that the permissions are right.
sudo chmod 700 /home/ise/.ssh                       # permission of the .ssh directory
sudo touch /home/ise/.ssh/authorized_keys           # create file
sudo chown ise:ise /home/ise/.ssh/authorized_keys   # set file ownership
sudo chmod 644 /home/ise/.ssh/authorized_keys       # set file permissions
Now, we have to add the content of the public keys into the authorized_keys file. One key per line!
You can use the CLI text editor nano to do so, but feel free to use your favorite method. Alternatives: WinSCP, ssh-copy-id
ISE GUI - Test your setup
There are two simple ways to confirm that it is working.
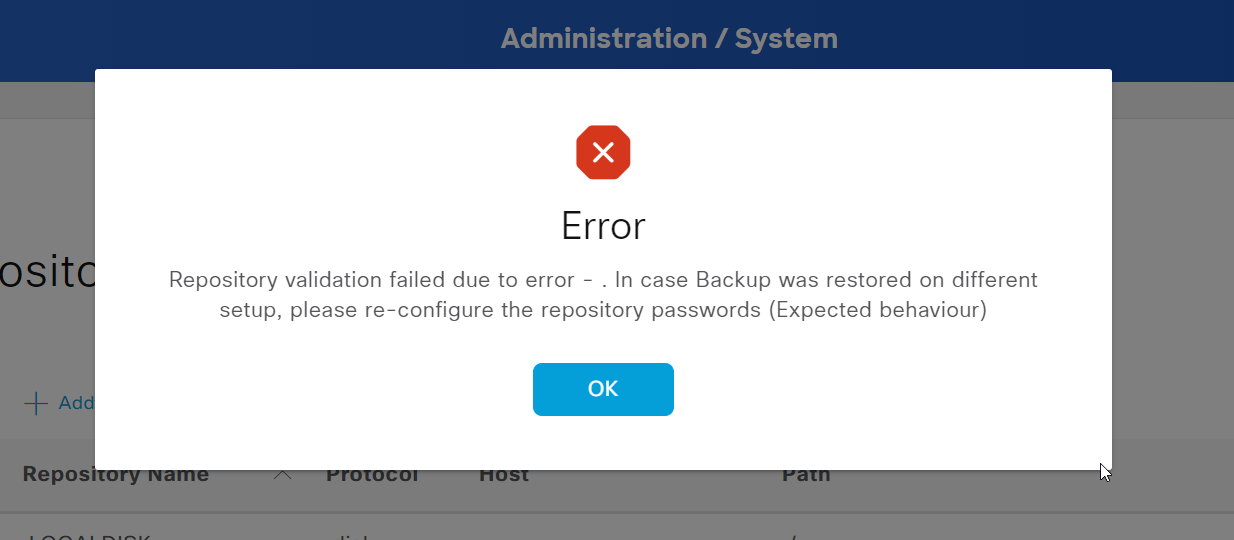
First, on ISE GUI, on the page with the repositories, you can choose the new repository and click Verify to make sure that the communication with the SFTP server is possible.
The second option would be to create a manual backup. Visit System > Administration > Backup & Restore
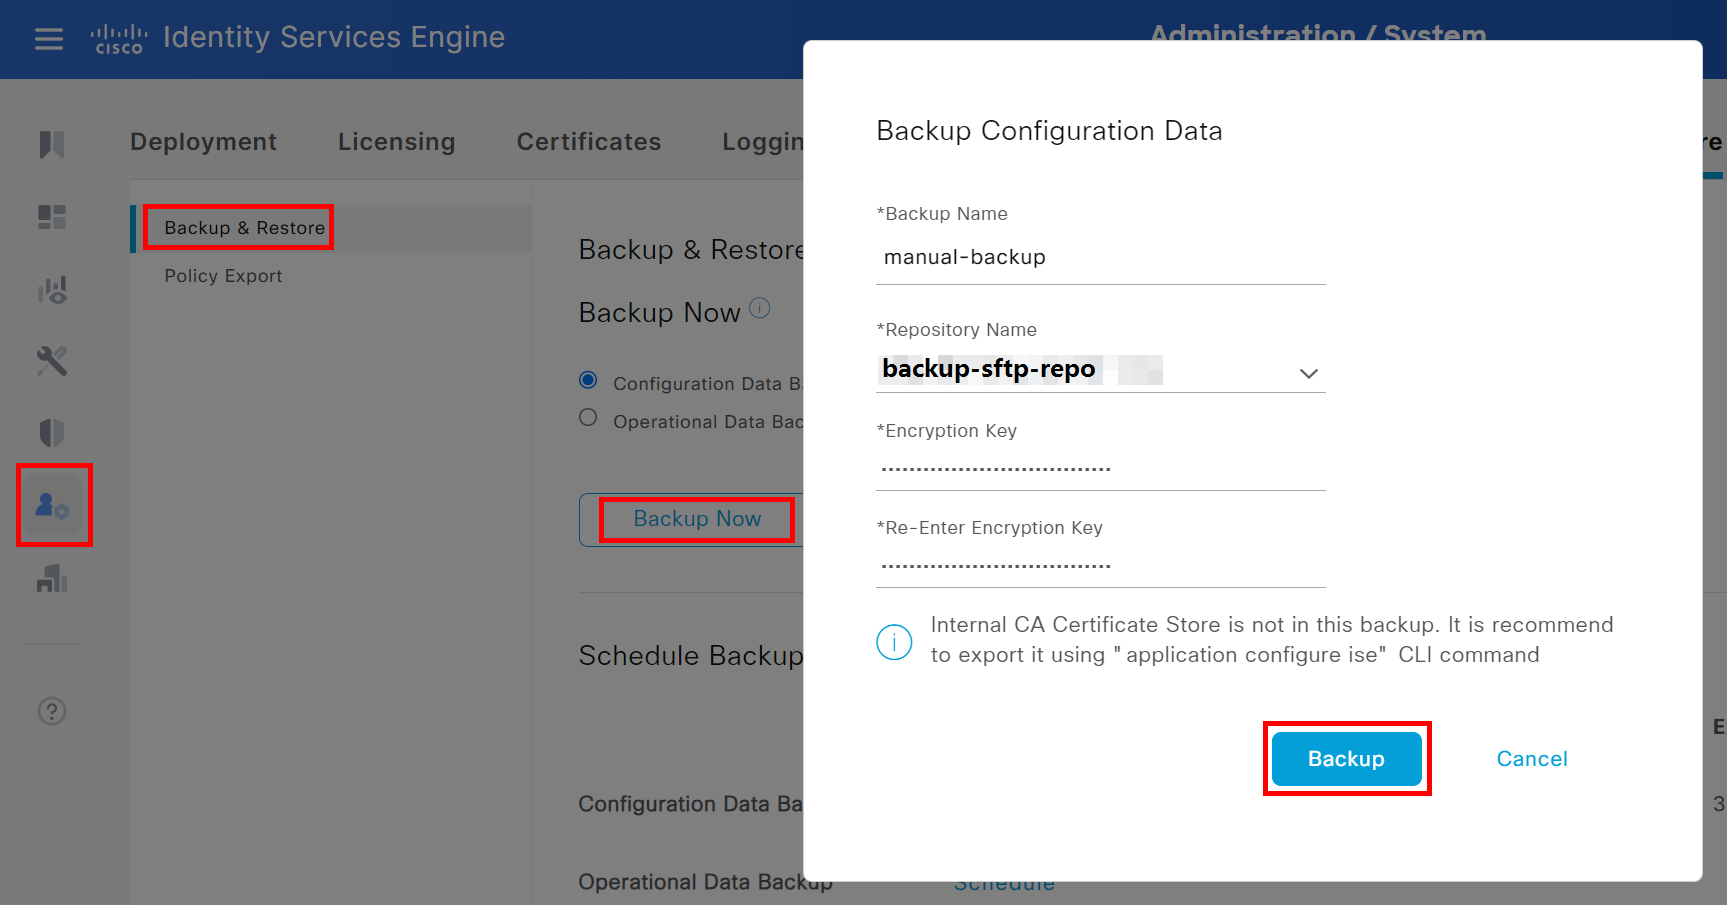
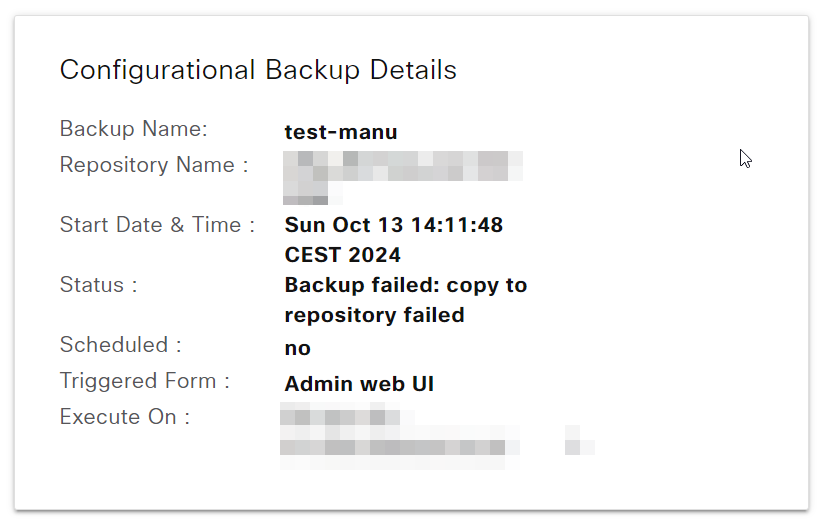
Choose Configuration Data Backup, and click on Backup Now. In the pop-up window, choose a name, the new repository, a secure passphrase and click on Backup.
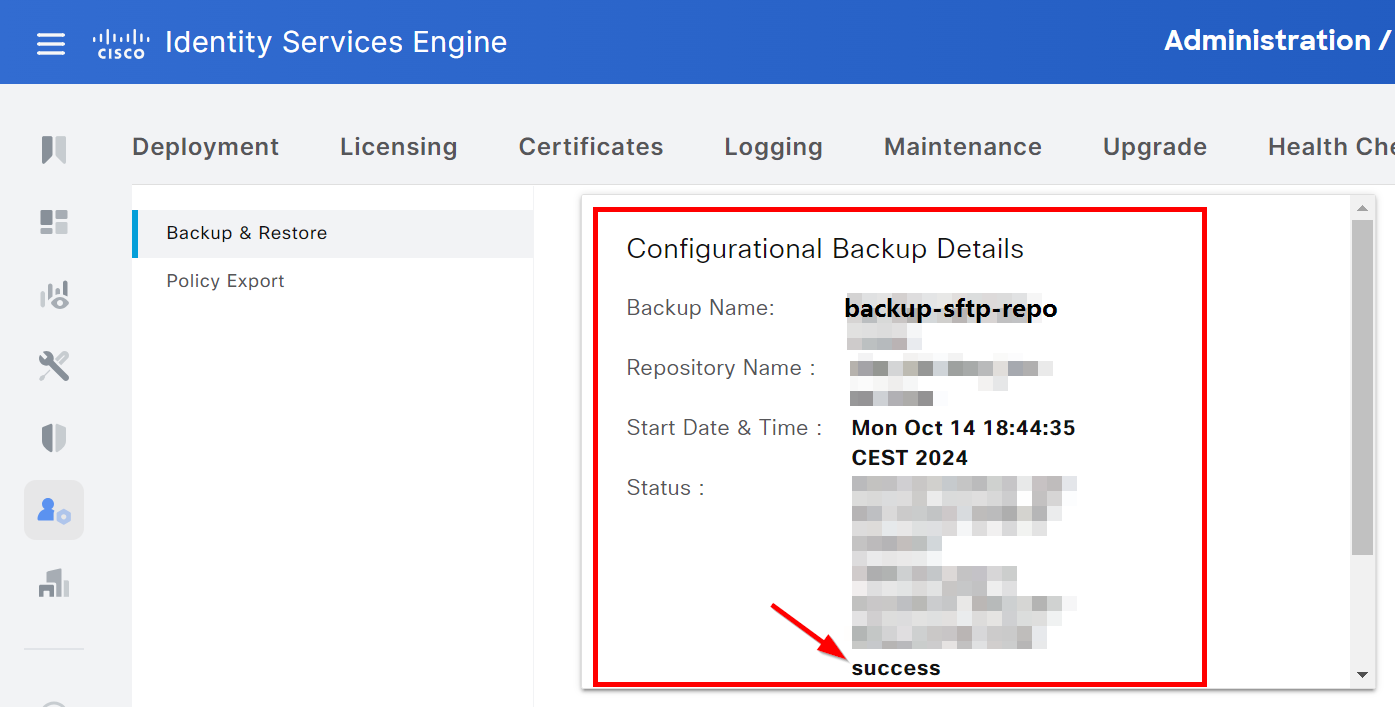
The status and result of the backup are present on the same page:
Conclusion
This should do the trick! - I created this guide sometime after the implementation, so feel free to let me know if I missed anything.
Additionally, I'd like to share some other articles that might help to troubleshoot and harden the system:
References #
No order, just a bookmark dump of the day of the implementation:
- https://www.cisco.com/en/US/docs/security/ise/1.0/user_guide/ise10_backup.html
- https://www.cisco.com/c/en/us/td/docs/security/ise/2-2/admin_guide/b_ise_admin_guide_22/b_ise_admin_guide_22_chapter_01011.html
- https://jmcristobal.com/2022/07/27/configuring-an-sftp-repository-in-ise/
- https://www.cisco.com/c/en/us/support/docs/security/identity-services-engine/215355-how-to-take-configuration-and-operation.html
- https://www.cisco.com/c/en/us/td/docs/security/ise/3-1/admin_guide/b_ise_admin_3_1/b_ISE_admin_31_maintain_monitor.html
- https://www.cisco.com/c/en/us/td/docs/security/ise/3-1/cli_guide/b_ise_cli_reference_guide_31/b_ise_CLIReferenceGuide_31_chapter_01.html